When it comes to vehicle maintenance and safety, few components are as critical as your brake system. One of the most vital elements in that system is your brake pads. Drivers often refer to “brake pads depth,” but what they actually mean is “brake pad thickness.” Understanding the significance of brake pads thickness is essential for keeping your vehicle safe and roadworthy.
This article dives deep into the concept of brake pads depth (i.e., brake pads thickness), including how to measure it, what depth is safe, and when to replace your brake pads. With detailed explanations, helpful tables, and FAQs, you’ll be fully informed about this crucial aspect of car maintenance.
Table of Contents
What Is Brake Pads Depth and Why It Matters
Brake pads depth refers to the remaining thickness of the material that contacts the brake rotor. Over time, this friction material wears down due to use. If the brake pads become too thin, they can no longer provide sufficient stopping power, increasing the risk of accidents.
When you press the brake pedal, the brake calipers press the pads against the rotors, creating friction and slowing the vehicle. With repeated use, the pads wear out, reducing their effectiveness. Monitoring brake pads thickness helps ensure optimal braking performance and vehicle safety.
Typical new brake pads have a thickness of 10-12 mm. When the thickness drops to 3 mm or less, it’s time to consider replacement. Ignoring this can lead to reduced braking efficiency, rotor damage, and even total brake failure.
Brake Pads Thickness Guidelines
| Condition | Thickness (mm) | Action |
|---|---|---|
| New Pads | 10-12 mm | No action needed |
| Good Condition | 8-10 mm | Monitor regularly |
| Moderate Wear | 4-7 mm | Plan replacement |
| Critical Wear | 3 mm or less | Replace immediately |
How to Measure Brake Pads Depth
Measuring brake pads depth is a straightforward process, and there are several ways to do it:
- Visual Inspection: Look through the wheel spokes to check the pad thickness. You may need a flashlight.
- Use a Ruler or Caliper Gauge: For a more accurate reading, use a measuring tool.
- Digital Brake Gauge: A specialized tool for precise measurement.
Step-by-Step Process:
- Park the vehicle on a flat surface.
- Remove the wheel for better access (optional but recommended).
- Locate the brake caliper and pads.
- Measure the pad material only (exclude the metal backing).
Many mechanics use a color-coded brake pad gauge:
- Green (7 mm+): Good
- Yellow (4-6 mm): Fair
- Red (3 mm or less): Replace
Signs Your Brake Pads Are Too Thin
Knowing the signs of thin brake pads can help you take action before it’s too late. Some common symptoms include:
- Squealing or Squeaking Noises: High-pitched sounds when braking often indicate wear indicators contacting the rotor.
- Grinding Noise: Metal-on-metal contact, signaling critical wear.
- Vibration When Braking: Uneven pad wear or rotor damage.
- Longer Stopping Distance: Reduced pad material lowers friction.
- Brake Warning Light: Some vehicles have sensors that trigger a dashboard alert.
Ignoring these symptoms can lead to increased repair costs and compromised safety. Regularly checking your brake pads thickness helps avoid these issues.

Factors That Affect Brake Pads Depth
Several variables can influence how quickly your brake pads wear out:
- Driving Habits: Aggressive driving with hard braking wears pads faster.
- Type of Vehicle: Heavier vehicles tend to wear out pads more quickly.
- Road Conditions: Stop-and-go traffic and hilly terrain increase wear.
- Brake Pad Material: Organic, semi-metallic, and ceramic pads wear differently.
Brake Pad Material Comparison
| Material | Longevity | Performance | Noise Level | Cost |
| Organic | Low | Moderate | Low | Low |
| Semi-metallic | Medium | High | Medium | Moderate |
| Ceramic | High | High | Low | High |
Understanding these factors can help you choose the right pads and anticipate maintenance intervals based on your driving style and environment.
7 Crucial Facts About Brake Pads
- Brake Pads Depth = Brake Pads Thickness
Many drivers use “depth” when they mean thickness. It’s the actual remaining material that provides stopping power. - 3mm Is the Minimum Safe Thickness
Once brake pads wear down to 3 mm, they must be replaced to maintain effective braking and avoid rotor damage. - Front Brake Pads Wear Faster
In most vehicles, front pads do more braking work and tend to wear out sooner than rear ones. - Brake Pads Should Be Checked Every 10,000 Miles
Routine checks prevent unexpected failures and ensure consistent stopping performance. - Driving Habits Greatly Affect Wear
Aggressive braking, stop-and-go traffic, and frequent downhill driving can wear pads faster. - New Technologies Improve Longevity and Safety
Modern pads feature wear sensors, noise reduction shims, and advanced materials like ceramics or copper-free blends. - Ignoring Pad Thickness Can Lead to Costly Rotor Damage
Replacing pads is far cheaper than replacing warped or gouged rotors.
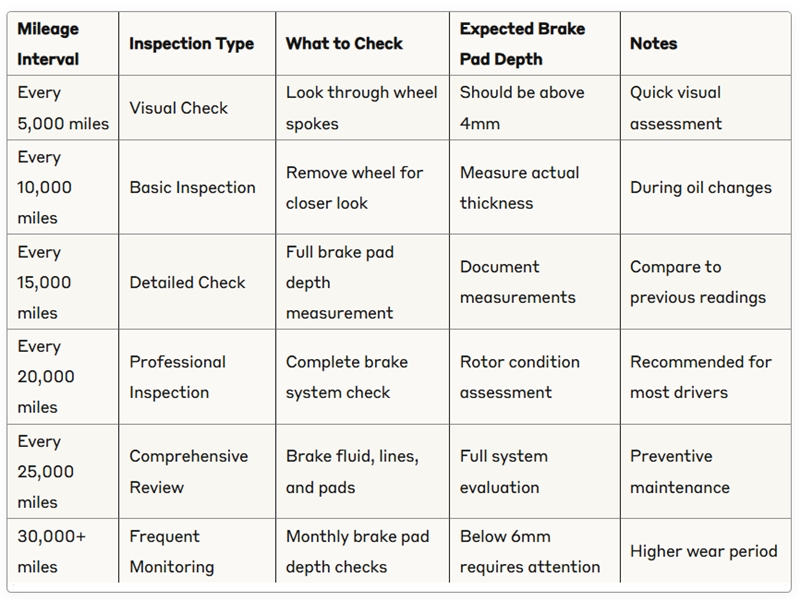
How Often Should You Check Brake Pads Thickness?
To maintain optimal braking performance, it’s recommended to check your brake pads every 10,000 to 15,000 miles, or at least twice a year. More frequent checks are advisable if you drive in demanding conditions.
A good practice is to inspect the pads whenever you rotate your tires or during oil changes. Most professional service centers will include this in their standard inspections.
Brake Pad Inspection Schedule
Cost of Ignoring Brake Pads Depth
Overlooking brake pads thickness can lead to serious consequences:
- Rotor Damage: Thin pads allow metal-to-metal contact, damaging the rotors.
- Increased Repair Costs: Rotor replacement is more expensive than pad replacement.
- Safety Hazards: Longer stopping distances and brake failure can lead to accidents.
Spending a small amount on regular inspections and timely pad replacement can save you from high repair bills and protect your safety.
Also read: The Complete Brake Warning Signs Guide: 11 Signs You Shouldn’t Ignore
Maintenance Checklist for Brake Pads
Here’s a simple downloadable maintenance checklist to help you stay on top of your brake pad health:
Download: Brake Pads Maintenance Checklist
Regular brake pads depth monitoring is crucial for vehicle safety and can save you hundreds in repair costs. This comprehensive checklist helps you track brake pad wear, schedule maintenance, and ensure your braking system performs reliably.
Print it out and keep it with your vehicle records, or fill it out digitally during your routine inspections. Whether you’re a DIY enthusiast or working with a professional mechanic, this tool ensures nothing gets overlooked when it comes to your brake system’s health.
DIY vs. Professional Brake Pad Inspection
Some car owners prefer to check their brake pads themselves, while others rely on professionals. Here’s how they compare:
DIY vs. Professional Brake Pad Checks
| Criteria | DIY Inspection | Professional Inspection |
| Tools Needed | Basic tools | Specialized equipment |
| Accuracy | Moderate | High |
| Time Investment | Low to Moderate | Low |
| Cost | Minimal | Service Fee |
| Recommendation | Enthusiasts or Budgeters | General Public or Inexperienced |
If you’re comfortable working on your vehicle, a DIY inspection can save money. Otherwise, a professional check ensures accurate results.
Brake Pads Thickness Laws & Regulations
Understanding the legal requirements for brake pad thickness is crucial for vehicle safety and compliance. Regulations vary by region and vehicle type. Here’s a breakdown:
United States (FMCSA / DOT)
The Federal Motor Carrier Safety Administration (FMCSA) sets minimum brake lining/pad thickness standards for commercial vehicles:
- Steering Axle Brakes:
- Air drum brakes: Minimum 4.8 mm (3/16 inch) for continuous strip linings; 6.4 mm (1/4 inch) for two pads.
- Air disc brakes: Minimum 3.2 mm (1/8 inch).
- Hydraulic disc, drum, or electric brakes: Minimum 1.6 mm (1/16 inch).
- Non-Steering Axle Brakes:
- Air drum brakes: Minimum 6.4 mm (1/4 inch).
- Disc brakes: Minimum 3.2 mm (1/8 inch).
- Hydraulic or electric brakes: Minimum 1.6 mm (1/16 inch).
United Kingdom
In the UK, the legal minimum brake pad thickness is 1.5 mm. However, it’s recommended to replace pads when they reach 3 mm to maintain optimal braking performance.
European Union
The EU mandates that replacement brake pads and linings comply with ECE Regulation 90 (ECE R90), ensuring they meet specific performance and quality standards. This regulation applies to vehicles up to 3.5 tonnes registered after March 31, 2001.
Also read: 5 Shocking Brake Pad Replacement Cost Factors That Could Save You Hundreds
How to Replace Brake Pads: A Complete DIY Guide
Knowing when and how to replace your brake pads is essential for vehicle safety. Understanding brake pad depth measurements helps you determine the right time for replacement, potentially saving hundreds of dollars in repair costs.
When to Check Your Brake Pads Depth
Regular brake pads depth inspections prevent dangerous situations and expensive rotor damage. Most brake pads start with 10-12mm of friction material, and replacement becomes necessary when the brake pads depth reaches 3-4mm.
Warning Signs Your Brake Pads Need Replacement
- Squealing or grinding noises when braking
- Brake pads depth below 4mm
- Vibration through the brake pedal
- Longer stopping distances
- Brake warning light activation
Tools and Materials Needed
Before starting your brake pad replacement project, gather these essential items:
Tools Required:
- Socket wrench set
- C-clamp or brake piston tool
- Wire brush
- Jack and jack stands
- Lug wrench
- Brake pads depth gauge (optional)
Materials Needed:
- New brake pads
- Brake cleaner spray
- High-temperature grease
- New brake fluid (if needed)
Safety Precautions
Vehicle maintenance requires proper safety measures. Always work on level ground, engage the parking brake, and never rely solely on a jack for support. Use jack stands to secure the vehicle before working underneath.

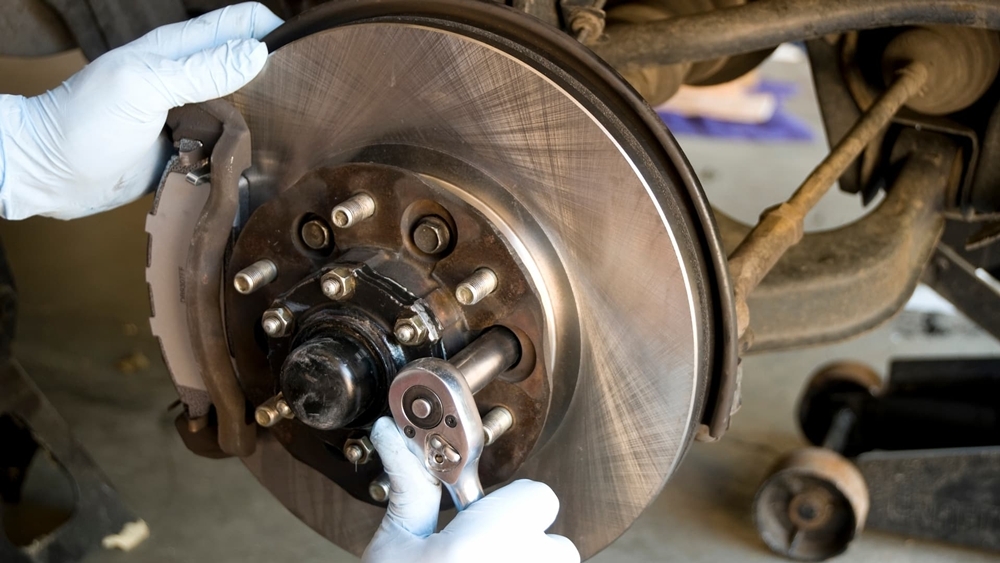
Step-by-Step Brake Pad Replacement Process
Step 1: Prepare Your Vehicle
Park on level ground and engage the parking brake. Loosen the lug nuts slightly before raising the vehicle. This prevents the wheel from spinning when you apply force to the lug nuts.
Step 2: Raise the Vehicle
Use a jack to lift the corner where you’re replacing brake pads. Secure the vehicle with jack stands placed on solid mounting points. Remove the wheel completely to access the brake assembly.
Step 3: Locate the Brake Caliper
The brake caliper sits over the brake rotor, holding the brake pads in position. You’ll typically find two bolts securing the caliper to the mounting bracket.
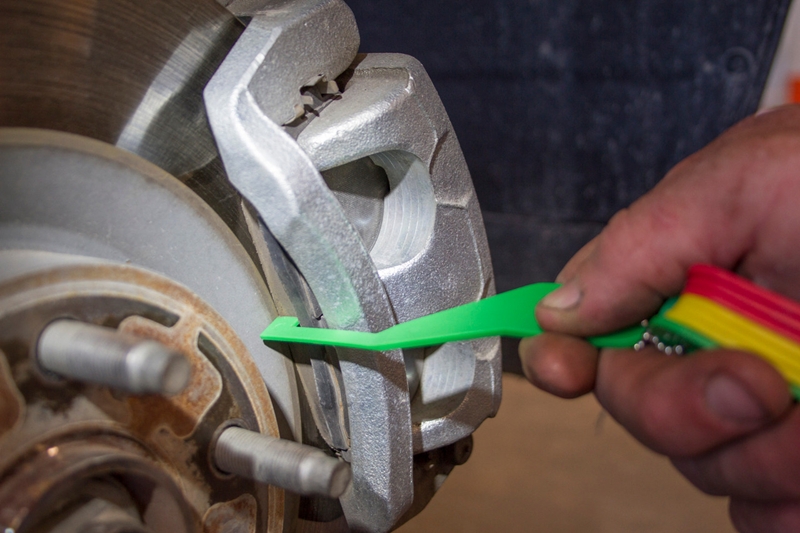
Step 4: Remove the Caliper
Carefully remove both caliper bolts using the appropriate socket size. Support the caliper with wire or a bungee cord to prevent stress on the brake line. Never let the caliper hang by the brake hose alone.
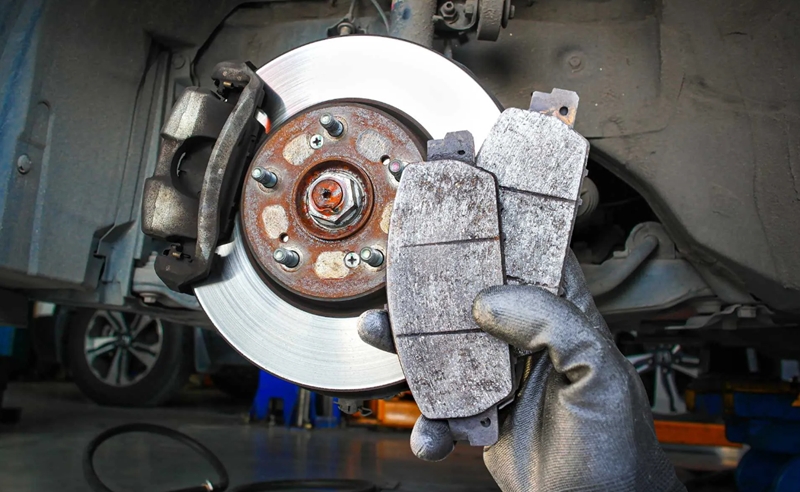
Step 5: Extract the Old Brake Pads
Remove the old brake pads from the caliper bracket. Take note of their orientation and any clips or shims attached. Some pads slide out easily, while others may require gentle tapping with a hammer.
Step 6: Inspect Brake Pads Depth and Rotors
Before installing new pads, measure the brake pads depth on your old pads to confirm replacement was necessary. Examine the brake rotors for scoring, excessive wear, or heat damage that might require resurfacing.
Step 7: Compress the Caliper Piston
The brake caliper piston must be pushed back to accommodate the thicker new brake pads. Use a C-clamp or specialized brake piston tool to slowly compress the piston into the caliper body.
Step 8: Install New Brake Pads
Apply a thin layer of high-temperature grease to the back of the new brake pads where they contact the caliper. Install the pads in the same orientation as the old ones, ensuring proper fit within the caliper bracket.
Step 9: Reinstall the Caliper
Position the caliper over the new brake pads and reinstall the caliper bolts. Tighten to manufacturer specifications, typically between 25-35 ft-lbs for most vehicles.
Step 10: Repeat for Other Side
Complete the same process on the opposite side of the vehicle. Replace brake pads in pairs to ensure even braking performance and prevent vehicle pulling to one side.
Brake Pads Depth Measurement Chart

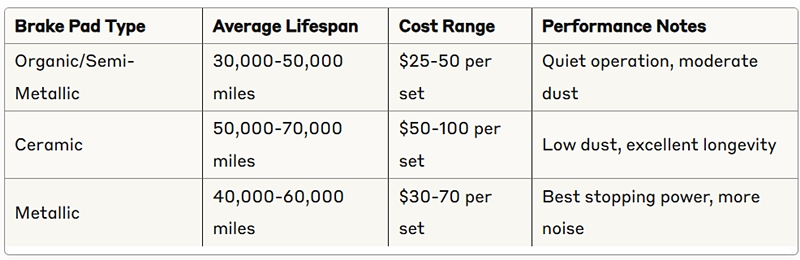
Brake Pad Lifespan Comparison
Post-Installation Procedures
Break-in Period
New brake pads require a proper break-in period for optimal performance. Drive gently for the first 200 miles, avoiding hard braking when possible. This allows the brake pads depth to properly seat against the rotor surface.
Test Your Brakes
Before driving normally, test your brakes at low speeds in a safe area. The brake pedal should feel firm and responsive. Pump the brakes several times to ensure proper brake pads contact with the rotors.
Maintenance Tips for Longer Brake Pad Life
Regular brake pads depth monitoring extends their lifespan significantly. Check your brake pads depth every 10,000 miles or during routine oil changes. Gentle braking habits and avoiding excessive speeds help maintain optimal brake pad depth over time.
Driving Habits That Affect Brake Pad Depth
- Avoid riding the brakes on long downhill sections
- Maintain proper following distance for gradual braking
- Use engine braking when possible
- Address brake fluid leaks immediately
When to Seek Professional Help
While brake pad replacement is manageable for many DIY enthusiasts, certain situations require professional assistance:
- Brake fluid leaks
- Warped or damaged rotors
- ABS system complications
- Hydraulic brake system issues
Cost Savings
DIY brake pad replacement can save $100-300 per axle compared to shop prices. However, proper brake pad depth measurement and installation are crucial for safety. Never compromise on brake system integrity, and seek professional help when unsure about any aspect of the repair.
Regular brake pad depth inspections and timely replacements ensure reliable stopping power and protect expensive brake rotors from damage. With proper tools and attention to detail, maintaining your brake system becomes a manageable and rewarding DIY project.
Remember, your vehicle’s brake pad depth directly affects your safety and that of others on the road. When in doubt about brake pad depth measurements or replacement procedures, consult a qualified mechanic for professional guidance.
FAQ: Brake Pads Depth
-
How often should I check my brake pad depth?
Check brake pad depth every 10,000 miles or during routine oil changes. High-mileage vehicles (over 30,000 miles) should be inspected more frequently.
-
What causes uneven brake pad wear?
Uneven wear can result from warped rotors, stuck caliper pistons, contaminated brake fluid, or misaligned suspension components.
-
Should I replace brake pads on both sides at the same time?
Yes, always replace brake pads in pairs (both front or both rear) to ensure even braking performance and prevent vehicle pulling.
-
What’s the difference between brake pad squealing and grinding?
Squealing indicates wear indicators touching the rotor (time to replace soon). Grinding means metal-on-metal contact (replace immediately).
-
Can I drive with brake pad depth below 3mm?
No. Driving with pads below 3mm is dangerous and can damage expensive brake rotors, leading to costly repairs.
-
How do different brake pad materials affect depth measurement?
Ceramic pads typically maintain consistent thickness longer, while semi-metallic pads may show more gradual wear patterns affecting depth readings.
-
What tools do I need to accurately measure brake pad depth?
A brake pad depth gauge, ruler, or caliper will give precise measurements. Flashlight and mirror can help with visual inspections.
-
Does brake pad depth affect my vehicle’s warranty?
Neglecting brake maintenance can void warranty coverage. Keep records of brake pad depth measurements and replacements for warranty protection.
-
How does driving style impact brake pad depth loss?
Aggressive braking, frequent stop-and-go traffic, and mountain driving accelerate brake pad wear, requiring more frequent depth monitoring.
-
What’s the cost difference between ignoring brake pad depth warnings?
Replacing worn pads costs $200-500 in average. Ignoring warnings can lead to rotor damage, adding $400-1200 to repair costs.
-
What is the minimum safe brake pads depth?
The minimum safe thickness is generally 3 mm. Below this, braking performance is compromised.
-
Can I visually inspect brake pads without removing the wheel?
Yes, if your wheels have large enough openings. However, for best accuracy, remove the wheel.
-
Do all brake pads wear out at the same rate?
No, front and rear pads wear differently depending on vehicle design and usage.
-
How long do brake pads typically last?
Depending on material and driving habits, pads can last between 25,000 to 70,000 miles.
-
Does pad thickness affect stopping distance?
Yes. Thinner pads mean less friction, which increases stopping distance.
Need a mechanic? Find one on the Mobile Mechanic Directory
Final Thoughts on Brake Pads Depth
Understanding brake pads depth—or more accurately, brake pads thickness—is essential for every car owner. Regular monitoring and timely replacement of worn pads ensure better performance, longer-lasting rotors, and most importantly, your safety.
Brake maintenance might seem minor, but it plays a major role in vehicle control. Don’t wait for the warning signs. Make brake pad checks a routine part of your vehicle maintenance.
Stay safe, stay proactive, and always keep an eye on your brake pads thickness.