Car thermostat replacement might not be the first thing on your mind—until your car’s running hot or taking forever to warm up. Trust me, I’ve been there. Nine times out of ten, when a car has temperature regulation issues, the culprit is that little device called the thermostat. It’s something many of us don’t think about until it fails, but understanding the car thermostat replacement cost and process can save you both money and headaches down the road.
Today, I’m breaking down everything you need to know about replacing your car’s thermostat—from recognizing when it’s time for a change to deciding whether to tackle the job yourself or leave it to the pros. Having replaced a few thermostats in my shop over the years, I can tell you it’s not as intimidating as it might seem.
Key Takeaways
- Car thermostat replacement is crucial for maintaining engine temperature and preventing costly overheating.
- Typical replacement intervals are every 100,000 miles or 10 years, but always watch for early warning signs like temperature fluctuations or poor heater performance.
- Average car thermostat replacement cost ranges from $125 to $400, depending on your vehicle and labor charges.
- DIY is a viable option for many, especially if the thermostat is easy to access—just make sure to use the correct part and follow safety steps.
- Professional mechanics are a smart choice if your car has a complex cooling system, limited access, or you’re short on time.
- Maintaining your cooling system after replacement (coolant flushes, hose inspections) will help extend the life of your new thermostat.
- Ignoring thermostat issues can lead to engine damage, breakdowns, and bigger repair bills down the road—don’t wait for failure to act.
Also read: 8 Alarming Symptoms of a Blocked Radiator
Table of Contents
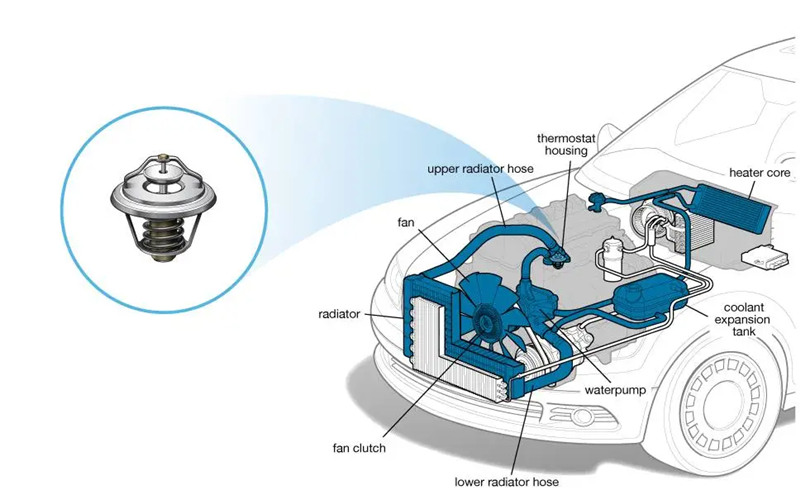
The thermostat in automobile cooling systems plays a crucial role—it regulates the flow of coolant between your engine and radiator, ensuring your car operates at the optimal temperature. When it works correctly, you’ll never notice it. When it fails, you’ll definitely know something’s wrong.
Understanding Your Car’s Coolant Thermostat
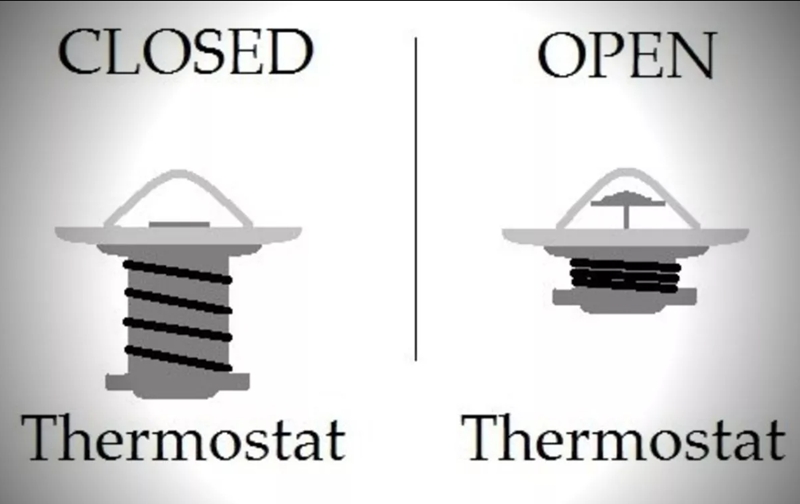
Before diving into replacement details, let’s understand what we’re dealing with. The coolant thermostat is essentially a valve that opens and closes based on the engine’s temperature. When your engine is cold, the thermostat remains closed, preventing coolant from circulating through the radiator. This helps your engine warm up faster.
Once the engine reaches its operating temperature (typically around 195°F), the thermostat opens, allowing coolant to flow through the radiator and cool the engine.
This simple coolant thermostat prevents two problems:
- Engines running too hot (overheating)
- Engines running too cold (poor fuel economy and performance)
There are two common ways a car thermostat can fail:
- Stuck open: Your engine takes forever to warm up, the heater blows cold air in winter, and you’ll likely notice poor fuel economy
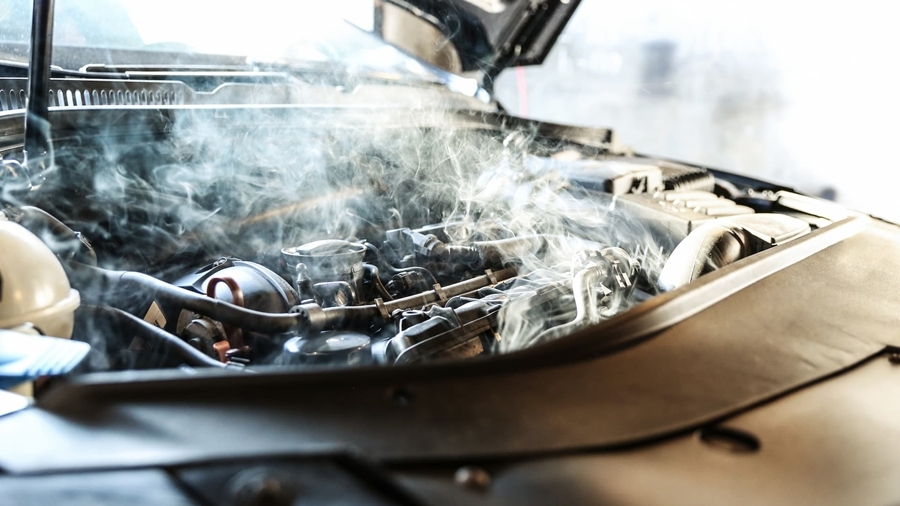
- Stuck closed: Engine overheats quickly, the temperature gauge climbs into the danger zone, and you might see steam from under the hood
I had a friend whose Honda’s coolant thermostat stuck closed on a summer road trip. Within minutes, the temperature gauge was pegged, and he was stuck on the shoulder watching steam billow from under the hood. Not how he planned to spend his afternoon! That experience taught him the importance of recognizing the symptoms and understanding the car thermostat replacement interval.
Car Thermostat Replacement Interval
Let’s talk about when you should actually swap out that thermostat in your ride. Here’s the thing about car thermostat replacement intervals – they’re not as clear-cut as oil changes. While your owner’s manual might be packed with maintenance schedules for filters, fluids, and belts, thermostats often get the cold shoulder (pun intended). Most manufacturers don’t actually specify a particular mileage for replacement, which leaves many of us scratching our heads.
From my experience, thermostats typically last anywhere from 60,000 to 100,000 miles under normal conditions – but “typically” is doing some heavy lifting in that sentence. I’ve seen some fail at 30,000 miles while others soldier on past 150,000 without breaking a sweat.
The environment you drive in makes a huge difference too. If you’re constantly battling stop-and-go traffic in Phoenix during summer, that thermostat is working overtime compared to someone cruising country roads in mild weather.
When to Replace Your Car’s Thermostat
Most manufacturers don’t specify a particular car thermostat replacement interval, but many mechanics recommend replacing it preventively every 10 years or 100,000 miles. In my experience, they tend to last quite a while, but when they fail, they rarely give much warning.
This is why many pro mechanics suggest a preventive car thermostat replacement around the 100,000-mile mark, even if it’s still functioning. Think of it as cheap insurance—the part itself usually costs between $10–50, which is peanuts compared to the potential thousands in engine damage if it fails catastrophically and causes overheating.
Signs it’s time for a car thermostat replacement
- Engine overheating (the most obvious sign)
- Engine taking too long to warm up
- Fluctuating temperature gauge readings
- Heater not producing warm air when the engine should be up to temperature
- Coolant leaking around the thermostat housing
- Check engine light with codes related to temperature regulation
My rule of thumb? If I’m already having cooling system work done—like replacing a radiator, water pump, or doing a flush—I’ll throw in a new thermostat while everything’s apart. The additional cost is minimal, and it just makes sense to refresh the whole system at once.
Bottom line: don’t wait for failure if you’re already deep into six-figure mileage territory. For a component this critical yet inexpensive, staying ahead of the car thermostat replacement curve just makes good sense.
I discovered this firsthand—many of my customers ignored the early warning signs: slight temperature fluctuations and occasionally lukewarm heat. By the time they addressed it, they were dealing with an overheated engine and potentially more damage. The lesson? Don’t put off car thermostat replacement when the signs appear.
The Real Cost of Car Thermostat Replacement
Let’s talk money—because that’s often what determines whether we DIY or call a pro mechanic. The car thermostat replacement cost breaks down into two parts: parts and labor.
The thermostat itself is relatively inexpensive:
- Basic thermostats: $5–$25
- OEM (Original Equipment Manufacturer) thermostats: $20–$50
- “Smart” or electronically controlled thermostats: $80–$300
However, the car thermostat replacement price you’ll pay at a shop includes labor, which varies based on your vehicle. Some cars have easily accessible thermostats that take 30 minutes to replace. Others require removing multiple components just to reach the thermostat housing.
The car thermostat replacement labor cost typically ranges from $75 to $200, depending on:
- Your vehicle make and model
- Your location (labor rates vary by region)
- The shop (dealerships typically charge more than independent mechanics)
All told, the average cost of car thermostat replacement at a professional shop ranges from $125 to $400 for most vehicles. Luxury or exotic cars can cost more—sometimes significantly more.
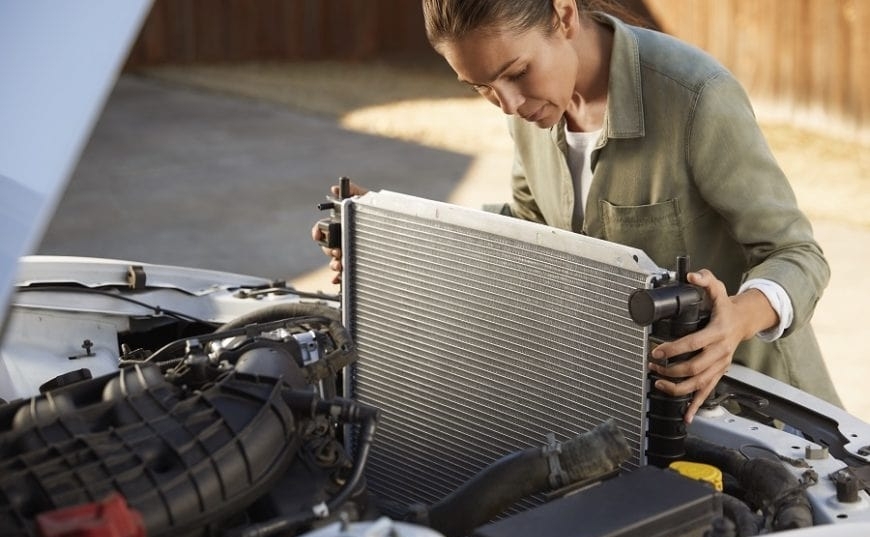
DIY Thermostat Replacement: Tools and Preparation
If you’re reasonably handy and want to save on the car thermostat replacement cost, DIY might be a good option. The car thermostat replacement time for most vehicles ranges from 30 minutes to 2 hours, depending on your experience and the vehicle’s design.
Here’s what you’ll need:
- Replacement thermostat (verify it’s the correct one for your vehicle)
- New gasket or RTV silicone sealant (as specified by your vehicle manufacturer)
- Basic hand tools (wrenches, screwdrivers, pliers)
- Coolant catch pan
- Fresh coolant for refilling
- Shop rags
- Safety glasses
Before starting, make sure your engine is COMPLETELY COOL. Working on a hot cooling system can result in serious burns. I learned this lesson the hard way early in my DIY car repair journey—coolant under pressure can spray everywhere if you open the system while it’s hot.
Preparation steps:
- Park on a level surface and set the parking brake
- Disconnect the negative battery terminal (recommended for safety)
- Place a catch pan under the area where you’ll be working
- Have plenty of rags handy for spillage
I always suggest taking photos with your phone as you disassemble things. This visual reference makes reassembly much easier, especially if you get interrupted or the job takes longer than expected.
Step-by-Step Guide to Replace Thermostat Housing
Now let’s get into the actual procedure to replace the thermostat housing and the thermostat itself. While specific steps vary by vehicle, the general process is similar:
- Drain the cooling system
- Locate the radiator drain petcock or lower radiator hose
- Open it and allow coolant to drain into your catch pan
- Close the drain once enough coolant has been removed
- Locate the thermostat housing
- Typically found where the upper radiator hose connects to the engine
- On some vehicles, it might be on the lower hose or in a less obvious location
- Consult your vehicle’s repair manual if you’re having trouble finding it
- Remove the thermostat housing
- Remove the bolts holding the housing in place
- Gently separate the housing from the engine block
- Be careful not to damage the mounting surfaces
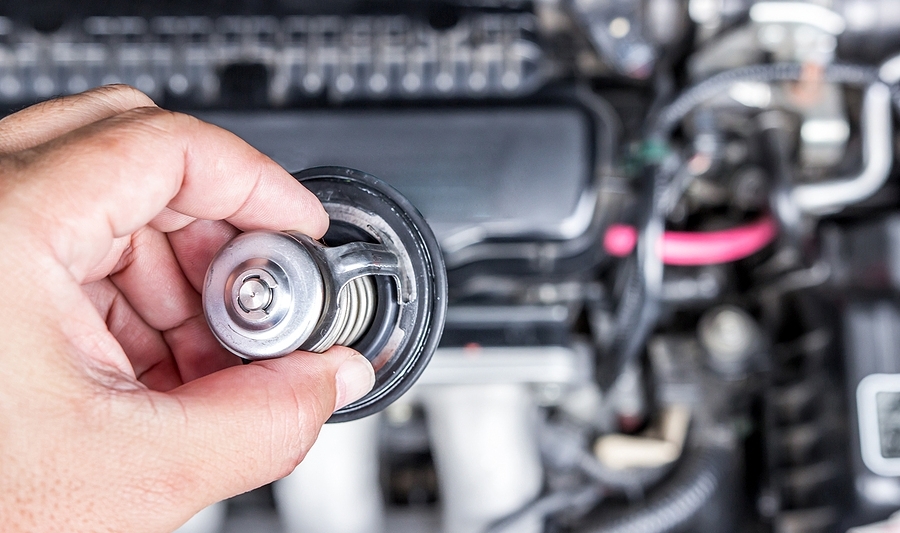
- Remove and replace the thermostat
- Take out the old thermostat and clean the mounting surfaces
- Note the orientation of the old thermostat—most must be installed in a specific direction
- Install the new thermostat with the spring facing the engine (in most cases)
- Use a new gasket or apply the appropriate sealant
The first time I did this job, I installed the thermostat backward. It was over 25 years ago when I was still a student, but let me tell you—that was a frustrating lesson! The car overheated immediately, and I had to do the entire car thermostat replacement job all over again. Always verify the correct orientation, usually with the spring facing into the engine and any air bleed valve pointing up.
Finishing the Job: Testing and Troubleshooting
After you’ve reinstalled the thermostat housing with a new thermostat, it’s time to refill the cooling system and test your work. This is critical for ensuring your car thermostat replacement was successful.
Here’s the proper way to finish up:
- Refill the cooling system
- Use the recommended coolant for your vehicle
- Follow the proper coolant-to-water ratio (usually 50/50)
- Fill slowly to avoid air pockets
- Bleed air from the system
- Many vehicles have specific bleeding procedures
- Generally, you’ll need to run the engine with the heater on and the radiator cap off
- Watch for air bubbles in the radiator neck or overflow tank
- Test your work
- Start the engine and let it warm up
- Watch the temperature gauge
- Verify that the upper radiator hose gets hot once the engine reaches operating temperature
- Check for leaks around the thermostat housing
The most common problems after car thermostat replacement are:
- Leaks (often from improper gasket installation)
- Air in the system causing overheating
- Incorrect thermostat (wrong temperature rating or size)
One of my mechanics once spent hours troubleshooting after a replacement only to discover we’d purchased a 180°F thermostat instead of the 195°F one specified for my vehicle. The car would run, but the check engine light stayed on because the computer expected different temperature behavior. Always make sure to buy the correct part for the job!
7 Costly Mistakes to Avoid During Car Thermostat Replacement
Even though replacing a thermostat can be a relatively straightforward job, there are plenty of mistakes that can turn a simple fix into a frustrating, expensive headache. Here are seven common (and costly) errors I’ve seen DIYers and even some pros make:
- Installing the Thermostat Backward
It’s a classic error. Most thermostats are directional, and installing one backward can prevent it from opening properly, leading to immediate overheating. Always make sure the spring faces the engine block and double-check the orientation. - Using the Wrong Thermostat Temperature Rating
Thermostats come in different temperature ratings—installing one rated too low or too high can trigger check engine lights, poor fuel economy, or even emissions issues. Always match your thermostat to your vehicle’s OEM specs. - Skipping the Gasket or Sealant Step
A proper seal is critical to prevent leaks. Forgetting to install a new gasket or failing to apply sealant correctly can cause coolant to leak around the housing and result in overheating or low coolant levels. - Not Bleeding Air from the Cooling System
Air pockets in the system can lead to erratic temperature readings or overheating. Always follow your vehicle’s bleeding procedure after refilling coolant to eliminate trapped air. - Reusing Old Coolant or Using the Wrong Type
Old or contaminated coolant can reduce efficiency and shorten the life of your new thermostat. Always use fresh, manufacturer-recommended coolant and the correct coolant-to-water mix. - Over-Tightening or Stripping Bolts
Thermostat housing bolts don’t need to be torqued like lug nuts. Over-tightening can crack the housing or strip threads in the engine block, which can be costly to repair. - Ignoring Signs of Bigger Cooling System Issues
If your thermostat failed, there may be a bigger problem—like a faulty water pump, clogged radiator, or cracked hoses. Replacing the thermostat without inspecting the whole system can lead to repeat failures.
Taking a few extra minutes to double-check your work and avoid these common mistakes can save you a lot of time, money, and frustration in the long run. Thermostat replacement is one of those jobs where attention to detail really pays off.
When to Call a Professional Mechanic
While car thermostat replacement is doable for many DIYers, there are times when calling a pro makes more sense. Consider hiring a professional mechanic if:
- Your vehicle has a complex cooling system
- The thermostat is in a difficult-to-access location
- You lack the necessary tools or workspace
- You’re not comfortable working with cooling systems
- Your schedule doesn’t allow for potential complications
Remember, the car thermostat replacement time quoted by professionals includes dealing with surprises that might pop up. They’ve seen it all—stripped bolts, broken housings, stubborn hoses—and they know how to fix them fast.
In my experience, even the “simple” jobs can turn into all-day events when you run into the unexpected. A professional might cost more upfront, but they’re equipped to handle setbacks without breaking a sweat.
Maintaining Your Cooling System After Replacement
Once you’ve tackled the thermostat, it’s smart to keep your cooling system in good shape to prevent future problems. A well-maintained system helps your car thermostat replacement last longer and perform better.
Here’s how to stay ahead of trouble:
- Follow the manufacturer’s coolant change schedule
- Check coolant level and condition regularly
- Inspect hoses and clamps for leaks or cracks
- Keep radiator fins clean and clear of debris
- Don’t ignore small issues—they often grow into big ones
Most cooling system problems don’t happen in isolation. A failing water pump can stress your thermostat. A clogged radiator can overheat the engine and ruin it. Think of your cooling system as a team—each part depends on the others to work right.
After one of my early car thermostat replacement projects, I made it a habit to check coolant levels monthly and inspect all hoses twice a year. That simple routine has helped me catch issues early and avoid breakdowns.
Is DIY Thermostat Replacement Worth It?
So, should you go DIY or leave car thermostat replacement to the pros? That depends on your comfort level, your vehicle’s design, and whether you’d rather save time or money.
DIY Advantages:
- Save on car thermostat replacement labor cost (usually $75–$200)
- Learn more about how your vehicle works
- Enjoy the satisfaction of fixing it yourself
Professional Advantages:
- Guaranteed work (many shops offer warranties)
- Safe, proper disposal of old coolant (which is toxic)
- Saves your time and effort
- Experts can handle any surprises
Frequently Asked Questions About Car Thermostat Replacement
-
What are the symptoms of a bad thermostat in a car?
Common signs of a faulty thermostat include engine overheating, erratic temperature gauge readings, poor fuel economy, or the cabin heater blowing cold air. These are all indicators that your vehicle’s cooling system may not be functioning properly and a car thermostat replacement could be needed.
-
Can I drive with a stuck thermostat?
Driving with a stuck thermostat—whether open or closed—is risky. A stuck-closed thermostat can cause rapid engine overheating, leading to expensive engine damage. A stuck-open one may result in poor heater performance and reduced fuel efficiency. Either way, it’s best to replace the thermostat as soon as symptoms appear.
-
How long does it take to replace a car thermostat?
Car thermostat replacement time typically ranges from 30 minutes to 2 hours. It depends on your car’s make and model, and whether the thermostat housing is easy to access. Some modern vehicles require removal of several engine components, which can increase labor time.
-
How much does it cost to replace a thermostat in a car?
The car thermostat replacement cost can range from $125 to $400 at a repair shop. This includes both parts and labor. Doing the job yourself can bring the total down to $10–$100 depending on whether you’re using a basic or electronically controlled thermostat.
-
Is it worth doing a DIY car thermostat replacement?
If you’re comfortable with basic DIY car repair and have the tools, it can be a great way to save on labor costs. Just be sure to follow proper procedures for draining coolant and bleeding the system to avoid air pockets. If the thermostat is in a hard-to-reach location, calling a professional mechanic might be a smarter move.
-
Should I replace the thermostat when doing other cooling system work?
Yes! If you’re already replacing the radiator, water pump, or doing a coolant flush, it’s smart to swap out the thermostat at the same time. It’s a relatively cheap part and replacing it can help maintain long-term cooling system efficiency.
Need a mechanic? Find one on the Mobile Mechanic Directory!
Final Thoughts
Whatever you decide, don’t ignore thermostat problems. The relatively modest average cost of car thermostat replacement is nothing compared to the damage an overheating engine can cause. Your thermostat is like your engine’s temperature guardian—take care of it, and it’ll keep your car running cool and efficient.
And remember, regular maintenance is always cheaper than emergency repairs. If your car is creeping up on 100,000 miles and still has the original thermostat, it might be time to replace it proactively. Trust me—your engine, and your wallet, will thank you.