Jump Starting a Car: Why Every Driver Needs to Know How
Jump starting a car — it’s something every driver should know, yet so many freeze up when the moment strikes. Believe it or not, according to AAA, nearly 25% of all roadside assistance calls are for dead batteries. That’s right! One in four breakdowns could potentially be solved in under 10 minutes with the right tools and a little know-how.
As a mechanic with over 25 years in the garage and on the road, I’ve seen it all—drivers using the wrong cables, mixing up battery terminals, and even setting off sparks like it’s the Fourth of July. Trust me, learning how to jump a car isn’t just useful—it can save your wallet, your time, and even your safety.
Also read: Mobile One Stop Auto Repair : 4 Reasons they Save You Time and Money
Still, many people hesitate or panic simply because they’ve never learned how to jump a car properly. It’s not something most schools teach, and unless you’ve had a dead battery before, it might never have crossed your mind. But once you’re in that situation—whether it’s a freezing winter morning or a scorching summer afternoon—you’ll wish you had taken five minutes to learn.
In this guide, I’ll walk you through everything from the tools you need to step-by-step instructions and pro-level tips to make sure you’re doing it safely and correctly. Whether you’re stuck in your driveway, helping a friend in a grocery store lot, or assisting a stranger on the roadside, knowing how to jump a car is an essential life skill. Trust me, it’s one of those things you don’t need—until you really, really do.
Also read: Top 9 Best Portable Jump Starter for Emergency Roadside Situations
What You Need to Jump Start a Car
Learning how to jump a car isn’t complicated, but having the right tools and setup makes all the difference. Before you even think about connecting cables, gather a few must-haves to ensure the process goes smoothly and safely.
Start with a solid pair of jumper cables. Look for ones that are at least 10 feet long, with a 4- or 6-gauge thickness. Thicker cables allow more current to flow, which can make the jump faster and more effective. Copper clamps are the gold standard—they offer better conductivity and a stronger connection.
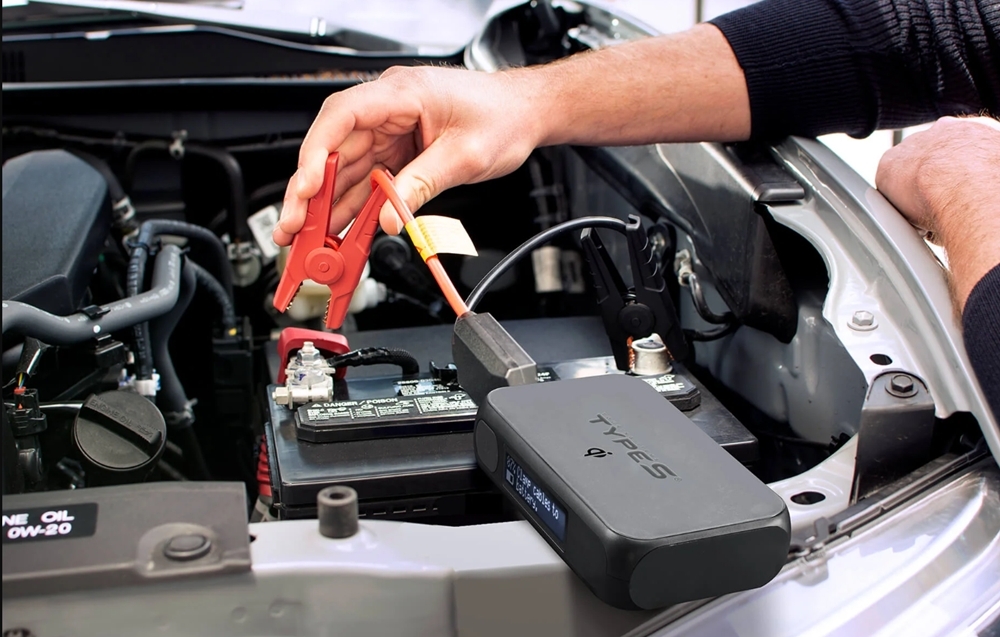
Next, you’ll need a second vehicle with a fully charged battery. If you’re flying solo, a portable jump starter is your best friend. These compact units can be lifesavers, especially in remote areas or late at night when there’s no one else around.
Safety matters when learning how to jump a car, so don’t overlook protective gear. Insulated gloves and safety glasses can protect you from sparks or accidental contact. A good flashlight also comes in handy, especially if you’re stuck after dark or need to see under the hood clearly.
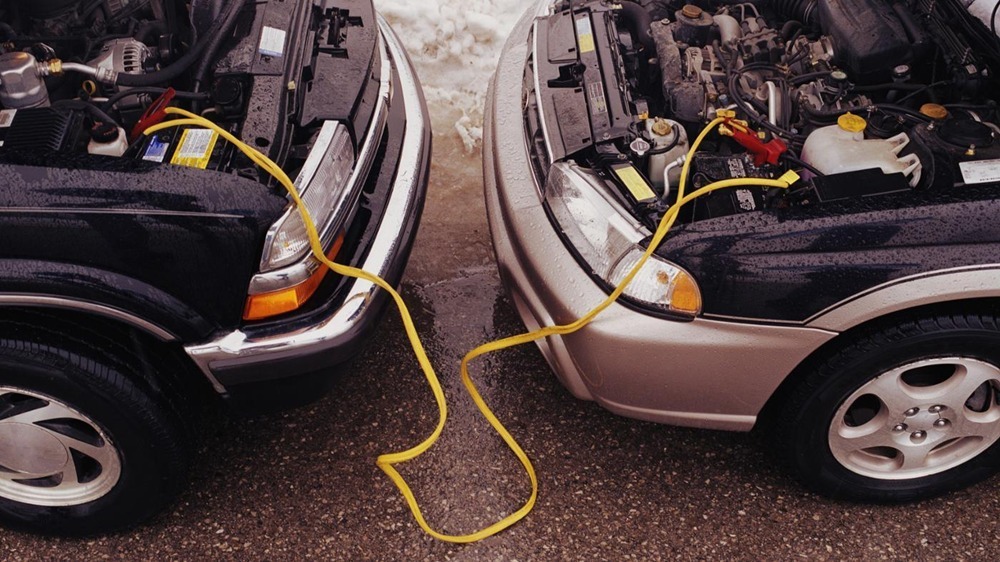
Before positioning the vehicles, make sure you’re on flat, level ground. Both cars should be in Park (or Neutral for manuals) with the parking brakes engaged. Keep the vehicles about 18 inches apart—close enough for the cables to reach but never touching.
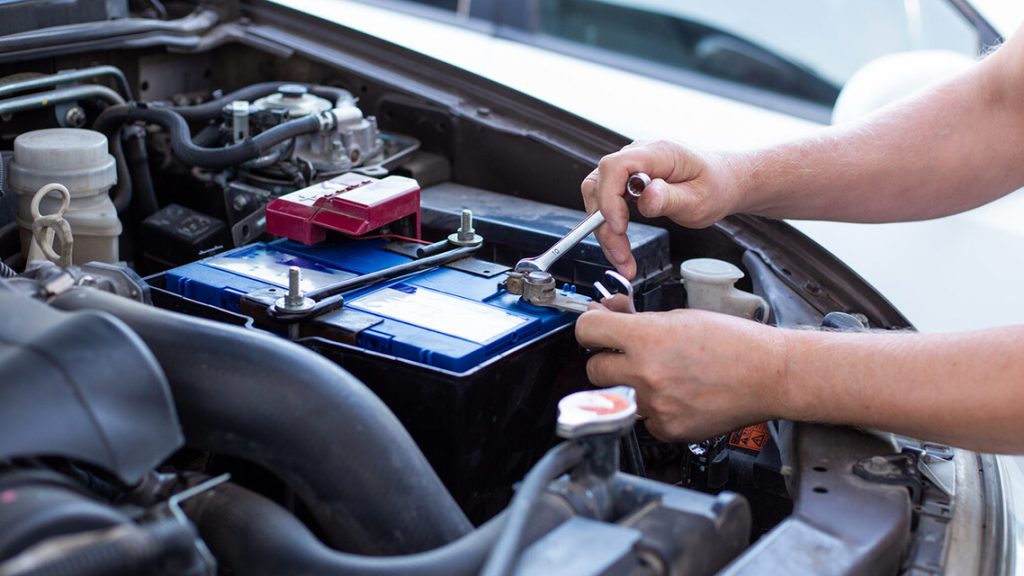
Inspect the jumper cables before use. Untangle them fully and check the clamps for corrosion or dirt. A clean, solid connection is key when figuring out how to jump a car the right way. If the battery terminals are grimy, give them a quick scrub with a wire brush or a battery terminal cleaner before attaching anything.
And if you’re using a jump starter instead of another car, confirm that it’s fully charged. Many models come with helpful features like LED lights or digital voltmeters. Take a minute to skim through the instruction manual for your specific unit—it could save you from costly mistakes.
Safety Precautions You Can’t Skip

Safety first, always—especially when learning how to jump a car. While it might seem like a simple process, working with car batteries involves real electrical risk if you’re not careful. Taking a few smart precautions can make the difference between a quick jump start and a dangerous situation.
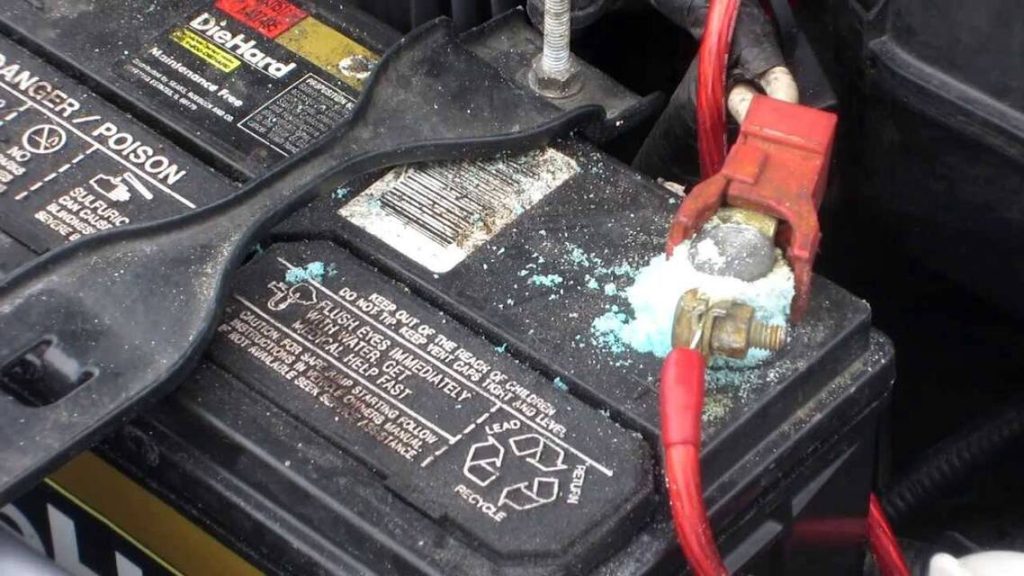
Start by inspecting the battery closely. If you notice any leaking fluid, bulging sides, cracked casing, or excessive corrosion around the terminals, do not attempt to jump it. A compromised battery can explode or leak acid, and no jump is worth that risk.
Turn off all electronics in both vehicles before you start—this includes headlights, radio, heater, A/C, and even phone chargers. Modern vehicles have complex electrical systems, and a sudden power surge could fry sensitive onboard components. One of the most important parts of knowing how to jump a car is understanding what not to do.
Remove any metal jewelry, like rings or bracelets, and keep tools, hands, and loose clothing away from the battery area when connecting cables. Metal conducts electricity, and even a brief contact can cause painful burns or dangerous sparks.
Make sure you have a clear view of both batteries. Stand on dry, solid ground—never in puddles, wet grass, or mud. Yes, jump starting in light rain is possible, but water is a conductor, so avoid any standing water or slippery surfaces to reduce the risk of shock.
Also, keep in mind that most passenger vehicles operate on 12-volt systems. Trying to jump start a car with a mismatched voltage—like from a heavy-duty diesel truck or commercial vehicle—can do serious damage. When learning how to jump a car, always double-check voltage compatibility before you connect anything.
Taking these safety precautions seriously is key to getting back on the road without injury or added vehicle damage. It’s not just about getting the engine to crank—it’s about doing it the right way.
Step-by-Step Instructions to Jump Starting a Car
If you’ve ever been stuck with a dead battery, knowing how to jump a car is a skill you’ll be thankful to have. Here’s a clear, step-by-step guide to help you safely get your vehicle running again. The entire process takes about 10 steps and can usually be done in under 15 minutes if everything goes smoothly.
How to Jump a Car in 10 Easy Steps:
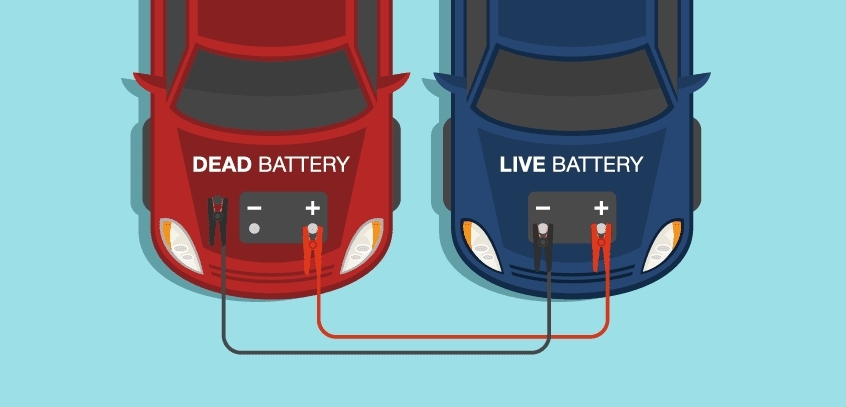
Step 1: Open the hoods and locate the batteries.
Make sure both vehicles are turned off and parked on level ground. Pop the hoods and identify the battery locations in each engine bay. Look for the positive (+) and negative (–) terminals.
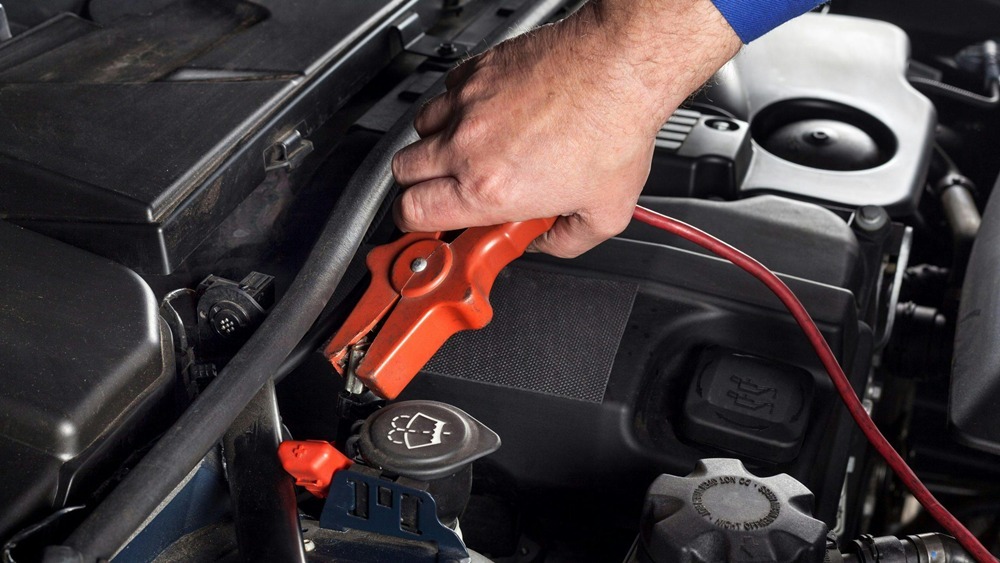
Step 2: Attach the red clamp to the dead battery’s positive terminal.
Take the red (positive) clamp and firmly connect it to the positive terminal of the dead battery.
Step 3: Connect the other red clamp to the positive terminal of the working battery.
Now move to the live vehicle and attach the other red clamp to its positive terminal.
Step 4: Attach the black clamp to the working battery’s negative terminal.
Next, attach one black (negative) clamp to the negative terminal of the working battery.
Step 5: Attach the final black clamp to an unpainted metal surface on the dead car.
This is an important safety step when learning how to jump a car. Don’t connect the black clamp directly to the dead battery’s negative terminal. Instead, attach it to a clean, unpainted metal part of the engine block or frame. This reduces the risk of sparks near the battery.
Step 6: Start the working vehicle.
Turn on the car with the good battery and let it run for about 2 to 3 minutes. This helps charge the dead battery before attempting to start it.
Step 7: Try starting the dead vehicle.
Attempt to start the car with the dead battery. If it doesn’t turn over right away, wait another 2–3 minutes and try again. Patience is part of learning how to jump a car the right way.
Step 8: Let both cars run for a few minutes.
Once the dead car starts, leave both vehicles running for another 2 to 5 minutes. This helps stabilize the power between the batteries.
Step 9: Disconnect the jumper cables in reverse order.
Carefully remove the cables in this exact order to avoid electrical shorts:
- Black clamp from the dead car’s engine block
- Black clamp from the working battery
- Red clamp from the working battery
- Red clamp from the revived battery
Avoid letting the clamps touch each other or any metal surfaces while removing them.
Step 10: Close the hood and check the latch.
Ensure the hood is securely latched before driving. A loose hood can be dangerous if it flies open while on the road.
After Jumping the Car
Once you’ve learned how to jump a car and got it running again, don’t shut it off right away. Let the engine run for at least 20 minutes to give the alternator time to recharge the battery. If you can, go for a short drive—especially at highway speeds—which is even better than idling.
Keep an eye on the dashboard. If any warning lights appear or the engine seems slow to turn over after restarting, your battery might be nearing the end of its life.
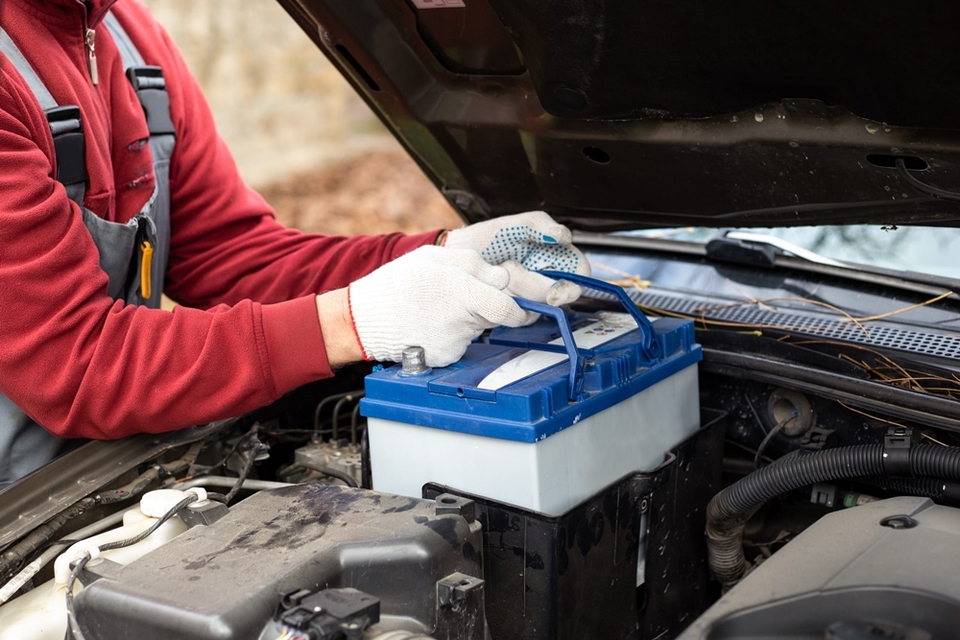
Check the manufacture date on your battery—usually printed on a label or engraved on the top. If it’s older than 3 to 5 years, it may be time for a replacement.
For peace of mind, stop by a local auto parts store. Many offer free battery testing and can tell you if your battery is still healthy or on the verge of failing again. Knowing how to jump a car is important—but knowing when to replace your battery is just as critical.
Jumper Cables vs. Portable Jump Starters: Which Is Better?
When it comes to learning how to jump a car, the first decision you’ll make is whether to use traditional jumper cables or invest in a portable jump starter. Both get the job done, but each has its pros and cons depending on your situation.
Jumper Cables: The Classic Option
Jumper cables are the old-school standby for a reason—they’re simple, affordable, and don’t require charging. If you know how to jump a car using cables, you can rely on the help of another driver and get back on the road in minutes. They’re compact and easy to store in your trunk. The downside? You need a second vehicle to give you that essential boost.
Portable Jump Starters: The Modern Upgrade
Also read: Top 9 Best Portable Jump Starter for Emergency Roadside Situations
A portable jump starter, on the other hand, can be a total game changer—especially when you’re stranded alone or in a remote area. These handy devices are small, powerful, and easy to use even for beginners.

Pros of Portable Jump Starters:
- No need for a second vehicle—just connect and go.
- Great for emergencies where no one is around to help.
- Many models include bonus features like air compressors, USB charging ports, and LED flashlights.
- Some include safety features like reverse polarity protection, so even if you’re unsure how to jump a car, you’re less likely to make a dangerous mistake.
Cons of Portable Jump Starters:
- You have to remember to keep them charged every few months, or they’ll be useless when you need them.
- They cost more up front than jumper cables, though prices have come down in recent years.
Still, I highly recommend keeping one in your trunk. Once you’ve learned how to jump a car and experienced the convenience of a portable jump starter, you’ll wonder how you ever got by without one. It’s a one-time investment that can save your day—or night—the moment your battery fails and no other car is around.
Common Mistakes to Avoid When Jump Starting the Car
Knowing how to jump a car is one thing—doing it safely and correctly is another. Some common mistakes can lead to serious damage or even personal injury. Here’s what to watch out for so you don’t turn a quick fix into a costly repair.
Mistake #1: Reversing the Clamps
One of the most dangerous mistakes you can make when learning how to jump a car is reversing the polarity—connecting the red clamp to the negative terminal or vice versa. This can cause major electrical damage, blow fuses, or even destroy your car’s onboard computer. Always double-check your clamp placement before turning anything on.
Mistake #2: Touching Clamps Together
Once connected to a live battery, the jumper cables carry current. Accidentally letting the clamps touch can create a powerful spark, damage the cables, or even ignite flammable gases near the battery.
Mistake #3: Jumping a Damaged or Leaking Battery
Never attempt to jump a battery that’s cracked, bulging, or leaking acid. Doing so could lead to chemical burns or even an explosion. If you see signs of damage, it’s best to call for professional help.
Mistake #4: Letting Vehicles Touch
While it might seem harmless, allowing the two vehicles to touch during a jump start can cause electrical feedback, damaging one or both cars’ sensitive electronics. Always keep them at least 18 inches apart.
Mistake #5: Disconnecting Too Early
Jumping a car takes more than a spark—it needs a few minutes of charging. Disconnecting the cables too soon might cause the car to stall again, especially if the battery hasn’t had time to build up enough voltage.
Knowing how to jump a car the right way means slowing down, staying focused, and checking your steps carefully. A few extra seconds of caution can save you a world of trouble.
When Jump Starting Doesn’t Work
Even if you know exactly how to jump a car, sometimes the issue goes deeper than a dead battery.
If you hear a clicking sound but the engine doesn’t crank—or worse, there’s total silence—it may mean the battery is beyond recovery. Other possible problems include:
- A faulty starter motor
- A bad alternator
- Loose battery cables
- Blown fuses or corroded connectors
You can do a quick alternator check by jump-starting the car, then removing the negative cable. If the engine stalls, it’s likely the alternator isn’t charging the battery.
When in doubt, call a professional. Forcing a jump repeatedly when there’s a deeper issue can strain your ignition system and cost you more in the long run.
Preventing a Dead Battery
Learning how to jump a car is great, but preventing a dead battery in the first place is even better. Here are some tips to keep your battery in good shape:
- Turn off all lights, accessories, and electronics before exiting the car.
- Drive regularly—especially in cold weather—to keep the charge up.
- Clean your battery terminals every few months with a wire brush and baking soda solution.
- Use a trickle charger or battery maintainer if the car sits unused for long periods.
- Replace your battery every 3–5 years, or sooner if it shows signs of failure.
- Check your charging system regularly to ensure the alternator is functioning properly.
- Park in a garage during winter months—cold temps can drain battery power by up to 30%.
By practicing good battery care and knowing how to jump a car when needed, you can avoid those frustrating no-start mornings and keep your car running smoothly.
Frequently Asked Questions About How to Jump a Car
Even if you’ve read the step-by-step instructions, it’s common to still have a few questions. Below are some of the most frequently asked questions people have when learning how to jump a car the right way.
Can I jump a car in the rain?
Yes, it’s safe to jump a car in light rain as long as you’re cautious. Avoid standing in water or touching wet metal parts while making connections. Just because you know how to jump a car doesn’t mean you should skip basic safety. Watch your footing and avoid slippery surfaces during the process.
Can I jump start a hybrid or electric vehicle?
Some hybrid vehicles have a 12-volt auxiliary battery that can be jumped, but it depends on the model. Always check your owner’s manual before trying. As for electric vehicles (EVs), they don’t use traditional starter batteries in the same way, so you should never attempt to jump an EV unless the manufacturer says it’s safe. If you’re unsure how to jump a car that’s a hybrid or EV, it’s best to contact a professional.
How long do I leave the jumper cables connected?
Once you’ve connected the cables correctly and the dead car starts, let both vehicles run for at least 2 to 5 minutes. This gives the dead battery time to build enough charge to keep the engine going. One of the most common mistakes people make when learning how to jump a car is disconnecting too early, which can result in a stall.
Do jumper cables go bad?
Absolutely. Over time, cables can wear out, especially if they’re stored in wet or humid conditions. Look for frayed wires, cracked insulation, or rusted clamps. Even if you know how to jump a car, faulty cables can stop you cold. It’s smart to check your cables every few months and replace them if they look worn.
What does a clicking sound mean when I turn the key?
A fast clicking sound usually points to a weak battery, while a single click can indicate a faulty starter. If your car won’t start even after a jump, there may be an issue with the alternator, starter, or the battery itself. Knowing how to jump a car can help diagnose the issue, but if the clicking persists, a mechanic should inspect your electrical system.
If you’re ever in doubt while learning how to jump a car, don’t hesitate to consult your owner’s manual or call roadside assistance. Taking a few extra moments for safety and accuracy can save you time, stress, and repair costs.
Final Thoughts on How to Jump a Car
Knowing how to jump a car is one of those essential skills every driver should carry with them—right up there with changing a tire or checking your oil. It’s simple when you know what to do, and it can save you from being stuck in a parking lot, at work, or on the side of the road.
’ve spent over two decades in the garage and on the roadside, and I can tell you—things go wrong when people guess their way through it. From reversed cables to damaged electronics, the risks are real. But I’ve also seen the smile of relief when someone successfully jump starts their car for the first time. Knowing how to jump a car gives you that kind of confidence.
So do yourself a favor: keep a solid pair of jumper cables or a fully charged portable jump starter in your trunk. Add a pair of gloves, a flashlight, and a wire brush while you’re at it. That small prep can mean the difference between a quick fix and an expensive tow.
And if you’re still feeling a little uncertain, ask your local mechanic to walk you through it. There’s no shame in asking, and a hands-on lesson can make how to jump a car feel second nature. Because when the moment comes, you’ll want to act with confidence—not confusion.
The next time your battery lets you down, you won’t be stuck. You’ll be ready.
Need a mobile mechanic? Find one on the Mobile Mechanic Directory!